기초편에서 이어지는 내용이므로 이전 포스팅을 보고 오는것을 추천합니다.
💫 화면을 클릭해서 새로운 마커를 찍어보기
1. GMSMapViewDelegate 추가
extension GMSMapViewRepresentable.Coordinator: GMSMapViewDelegate {
    // 화면을 클릭할 때마다 실행
    func mapView(_ mapView: GMSMapView, didTapAt coordinate: CLLocationCoordinate2D) {
        let marker = GMSMarker(position: coordinate)
        marker.snippet = "\(coordinate.latitude)\n\(coordinate.longitude)"
        marker.icon = GMSMarker.markerImage(with: .blue)
        parent.markers.append(marker)
    }
}
화면을 클릭하면 mapView(_:didTapAt:) 메소드가 실행되는데 그때 클릭한 위치에 새로운 마커를 추가한다. 추가적으로 marker.icon으로 마커의 이미지를 바꿀수 있는데 GMSMarker.markerImage(with: UIColor?)로 기존마커모양의 색상을 바꿀수도 있다.
2. GMSMapViewRepresentable 수정
struct GMSMapViewRepresentable: UIViewRepresentable {
    @Binding var markers: [GMSMarker] // 👈 marker가 추가되면 updateUIView 실행

    private let locationManager = CLLocationManager()
    private let mapView = GMSMapView(frame: .zero)

    func makeCoordinator() -> Coordinator {
        Coordinator(self)
    }

    func makeUIView(context: Context) -> GMSMapView {
        // locationManager 설정
        locationManager.desiredAccuracy = kCLLocationAccuracyBest
        locationManager.requestWhenInUseAuthorization()
        locationManager.startUpdatingLocation()
        locationManager.delegate = context.coordinator

        // mapView 설정
        mapView.settings.myLocationButton = true // 우측아래 내위치
        mapView.isMyLocationEnabled = true // 내위치 파란점으로 표시
        mapView.delegate = context.coordinator // 👈 GMSMapViewDelegate 연결

        return mapView
    }

    func updateUIView(_ uiView: GMSMapView, context: Context) {
        markers.forEach { $0.map = uiView } // 👈 마커를 mapView에 연결
    }
}
3. ContentView 수정 및 확인
import SwiftUI
import GoogleMaps // 👈 GMSMarker를 써야하므로 임포트해주기

struct ContentView: View {
    @State private var markers: [GMSMarker] = [] // 👈 저장할 markers 데이터

    var body: some View {
        GMSMapViewRepresentable(markers: $markers) // 👈 markers를 넘겨줘야한다.
    }
}
GMSMapViewRepresentable에 markers를 넘겨줘야 하므로 ContentView도 필요한 부분을 추가해주었다. 그리고 굳이 현재위치에서 테스트 하지않아도 되므로 프리뷰에서 화면을 클릭해서 확인해보자

프리뷰에서 화면을 클릭할 때마다 새로운 마커가 추가되고 마커를 클릭하면 정보창까지 나오는 것을 확인할수있다.
✔️ mapView(_:didTapAt:): 화면이 클릭될 때마다 실행되는 GMSMapViewDelegate 메소드
💫 마커를 클릭했을 때 나오는 InfoWindow 커스텀해보기
1. SwiftUI로 CustomInfoWindow 화면 만들기
import SwiftUI
import GoogleMaps

struct CustomInfoWindow: View {
    let title: String?
    let snippet: String?

    var body: some View {
        VStack {
            if let title {
                Text(title)
            }

            if let snippet {
                Text(snippet)
            }
        }
        .padding()
        .background(Color.white)
    }
}

struct CustomInfoWindow_Previews: PreviewProvider {
    static var previews: some View {
        CustomInfoWindow(title: "서울특별시", snippet: "서울")
            .border(Color.black)
    }
}
간단하게 title과 snippet만 보여주는 화면을 만든다.
2. GMSMapViewDelegate 작성
extension GMSMapViewRepresentable.Coordinator: GMSMapViewDelegate {
    // 화면을 클릭할 때마다 실행
    func mapView(_ mapView: GMSMapView, didTapAt coordinate: CLLocationCoordinate2D) {
    	...
    }

    // InfoWindow 커스텀
    func mapView(_ mapView: GMSMapView, markerInfoWindow marker: GMSMarker) -> UIView? {
        let customInfoWindow = CustomInfoWindow(title: marker.title, snippet: marker.snippet)
        let hostingView = UIHostingController(rootView: customInfoWindow)
        hostingView.view.frame = mapView.frame
        hostingView.view.sizeToFit()
        hostingView.view.backgroundColor = .clear
        return hostingView.view
    }
}
mapView(_:markerInfoWindow:) 메소드에서 리턴되는 UIView를 마커를 클릭했을때 보여주게된다. 먼저 앞서 만든 CustomInfoWindow를 변수로 저장하고 UIHostingController로 감싼다. UIViewRepresentable이 UIKit 뷰를 SwiftUI에서 사용하는 것이라면 UIHostingController는 SwiftUI 뷰를 UIKit에서 사용할때 필요하다. 감싼 hostingView의 view가 customInfoWindow이므로 알맞게 설정을 적용하고 리턴해주면 된다.
3. 확인해보기

제주도에 마커를 찍고 클릭해보면 위와같이 Jeju-do, Seogwipo가 잘 나온다.
✔️ mapView(_:markerInfoWindow:): 마커를 클릭할때 InfoWindow를 리턴하는 GMSMapViewDelegate 메소드
💫 클러스터링
1. GoogleMapsUtils 설치하기
구글맵스에서 제공하는 클러스터링을 사용할 예정이므로 공식문서를 보고 GoogleMapsUtils를 임포트하자.
2. 커스텀 클러스터 아이템 객체 만들기
final class MapMarker: NSObject, GMUClusterItem {
    let position: CLLocationCoordinate2D
    var title: String?
    var snippet: String?

    init(title: String? = nil, snippet: String? = nil, position: CLLocationCoordinate2D) {
        self.title = title
        self.snippet = snippet
        self.position = position
    }

    init(title: String? = nil, snippet: String? = nil, latitude: Double, longitude: Double) {
        self.title = title
        self.snippet = snippet
        self.position = CLLocationCoordinate2D(latitude: latitude, longitude: longitude)
    }

    init(marker: GMSMarker) {
        self.title = marker.title
        self.snippet = marker.snippet
        self.position = marker.position
    }
}
클러스터링을 보여줄때는 GMSMarker가 아니라 GMUClusterItem을 쓰는 것을 권장하므로 새로운 모델을 만들었다. 편하게 커스텀해서 쓰면 될 것같다. (GMSMarker를 클러스터링에서 쓰면 에러가 나는듯하다..?)
3. GMUClusterManager 추가하기
extension GMSMapViewRepresentable {
    final class Coordinator: NSObject {
        let parent: GMSMapViewRepresentable
        var clusterManager: GMUClusterManager? // 👈 Coordinator에 GMUClusterManager를 추가하여 사용

        init(_ parent: GMSMapViewRepresentable) {
            self.parent = parent
        }
    }
}
struct GMSMapViewRepresentable: UIViewRepresentable {
...
func makeUIView(context: Context) -> GMSMapView {
// locationManager 설정
...
// mapView 설정
...
// clusterManager 설정
let iconGenerator = GMUDefaultClusterIconGenerator()
let algorithm = GMUNonHierarchicalDistanceBasedAlgorithm()
let renderer = GMUDefaultClusterRenderer(mapView: mapView, clusterIconGenerator: iconGenerator)
context.coordinator.clusterManager = GMUClusterManager(map: mapView, algorithm: algorithm, renderer: renderer)
context.coordinator.clusterManager?.setMapDelegate(context.coordinator)
return mapView
}
...
}
4. GMSMarker를 MapMarker로 바꾸기
struct GMSMapViewRepresentable: UIViewRepresentable {
    @Binding var markers: [MapMarker]

    ...

    func updateUIView(_ uiView: GMSMapView, context: Context) {
//        markers.forEach { $0.map = uiView }
        // 👇 클러스터링을 쓰기위해서는 아래처럼 코드를 수정해야한다.
        context.coordinator.clusterManager?.clearItems() // 전체 마커 지우기
        context.coordinator.clusterManager?.add(markers) // 전체 마커 추가하기
        context.coordinator.clusterManager?.cluster() // 클러스터링
    }
}
extension GMSMapViewRepresentable.Coordinator: GMSMapViewDelegate {
// 화면을 클릭할 때마다 실행
func mapView(_ mapView: GMSMapView, didTapAt coordinate: CLLocationCoordinate2D) {
let geocoder = GMSGeocoder()
geocoder.reverseGeocodeCoordinate(coordinate) { [weak self] response, error in
guard error == nil else { return }
if let result = response?.firstResult() {
let marker = GMSMarker()
marker.position = coordinate
marker.title = result.administrativeArea
marker.snippet = result.locality
marker.icon = GMSMarker.markerImage(with: .blue)
// 👇 MapMarker로 수정
let mapMarker = MapMarker(marker: marker)
self?.parent.markers.append(mapMarker)
}
}
}
...
}struct ContentView: View {
@State private var markers: [MapMarker] = [] // 👈 MapMarker로 수정
...
}
5. 클러스터링을 클릭했을때 화면 확대하기
extension GMSMapViewRepresentable.Coordinator: GMSMapViewDelegate {
    // 화면을 클릭할 때마다 실행
    func mapView(_ mapView: GMSMapView, didTapAt coordinate: CLLocationCoordinate2D) {
        ...
    }

    // InfoWindow 커스텀
    func mapView(_ mapView: GMSMapView, markerInfoWindow marker: GMSMarker) -> UIView? {
        ...
    }

    // GMSMarker를 클릭했을 때마다 실행
    func mapView(_ mapView: GMSMapView, didTap marker: GMSMarker) -> Bool {
        mapView.animate(toLocation: marker.position)

        if marker.userData is GMUCluster { // 클러스터링 마커일때 실행
            mapView.animate(toZoom: mapView.camera.zoom + 1)
            return true // InfoWindow 숨기기
        }

        return false // InfoWindow 보이기
    }
}
6. 확인해보기

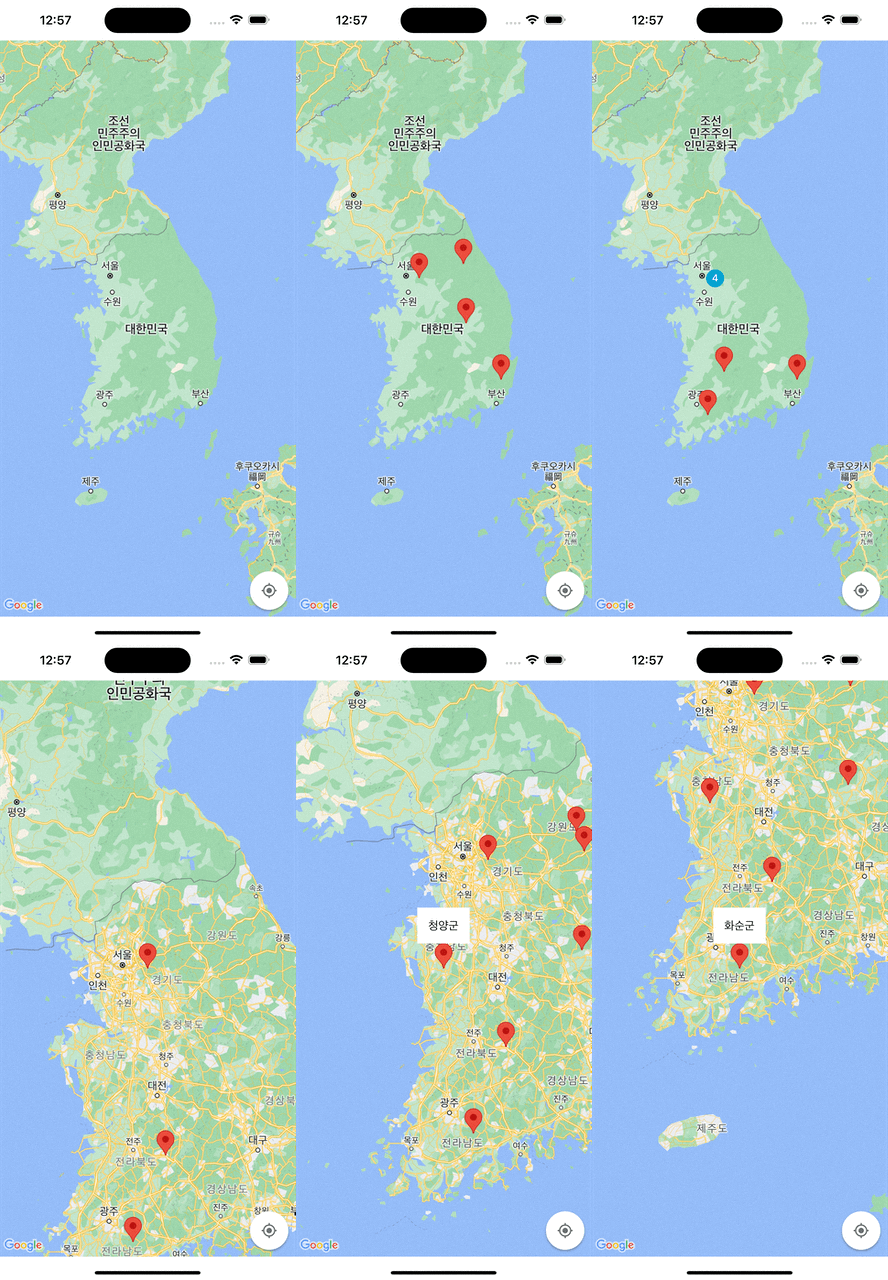
시뮬레이터로 실행해서 느리지만 실제 기기에서 해보면 아주 부드럽게 클러스터링이 되는 것을 확인 할 수 있다.
✔️ mapView(_:didTap:): 마커를 클릭할 때마다 실행되는 GMSMapViewDelegate 메소드
'iOS > SwiftUI' 카테고리의 다른 글
| SwiftUI의 AttributedString사용해보기 (feat. hacking with swift) (0) | 2024.01.25 |
|---|---|
| SwiftUI Bordering (inside, half, outside) (0) | 2023.10.06 |
| SwiftUI에서 GoogleMapsAPI 적용해보기 - 기초 (0) | 2023.02.19 |
| Alignment Guides (0) | 2022.07.11 |
| SwiftUI로 CheckBoxTreeView 만들기! (0) | 2022.07.01 |


